Deploy the Loki Helm chart on Azure
ကျွန်တော်ဒီနေ့မှာတော့ Loki ကို Azure AKS ပေါ်မှာ azure blob storage ကို backend အဖြစ် သုံးပြီး deployလုပ်ပုံကိုရှင်းပြပေးပါမယ်။ Loki ဆိုတာ lightweight logging solution တစ်ခုဖြစ်ပြီး ပုံမှန်ဆိုရင် server ရဲ့ disk storage ကိုသုံးတာမလို့ storage ပြည့်သွားရင် ပြသနာတွေဖြစ်လာနိုင်ပါတယ်။ အဲ့ဒါမလို့ Azure Blob တို့ AWS S3တို့လို storage backend တစ်ခုကိုသုံးပေးသင့်ပါတယ်။ ဒါကြောင့် ကျွန်တော်က azure blob ကိုသုံးပြီး ဒီနေ့ရှင်းပြပေးသွားပါမယ်။
Loki ကို azure နဲ့ authenticate လုပ်ဖို့ နည်းလမ်း(၃)ခုရှိပါတယ်။
- Hard coding a connection string
- Manged identity
- Federated token
ကျွန်တော်ဒီနေ့မှာတော့ Federated Tokenကိုသုံးပြီး Loki ကို AKS ပေါ်မှာ deploy လုပ်တာကိုတစ်ဆင့်ချင်းရှင်းပြပေးသွားမှာဖြစ်ပါတယ်။ connection string ကိုသုံးတာက production environment အတွက်အဆင်မပြေပါဘူး။
အရင်ဆုံး storage accounts တစ်ခုကို create လုပ်ပေးရပါမည်။
az storage account create \
--name <NAME> \
--location <REGION> \
--sku Standard_ZRS \
--encryption-services blob \
--resource-group <MY_RESOURCE_GROUP_NAME>
ပြီးနောက် chunks နဲ့ ruler အတွက် containers တွေကို create ပေးရပါမယ်။
az storage container create --account-name <STORAGE-ACCOUNT-NAME> --name <CHUNK-BUCKET-NAME> --auth-mode login && \
az storage container create --account-name <STORAGE-ACCOUNT-NAME> --name <RULER-BUCKET-NAME> --auth-mode login
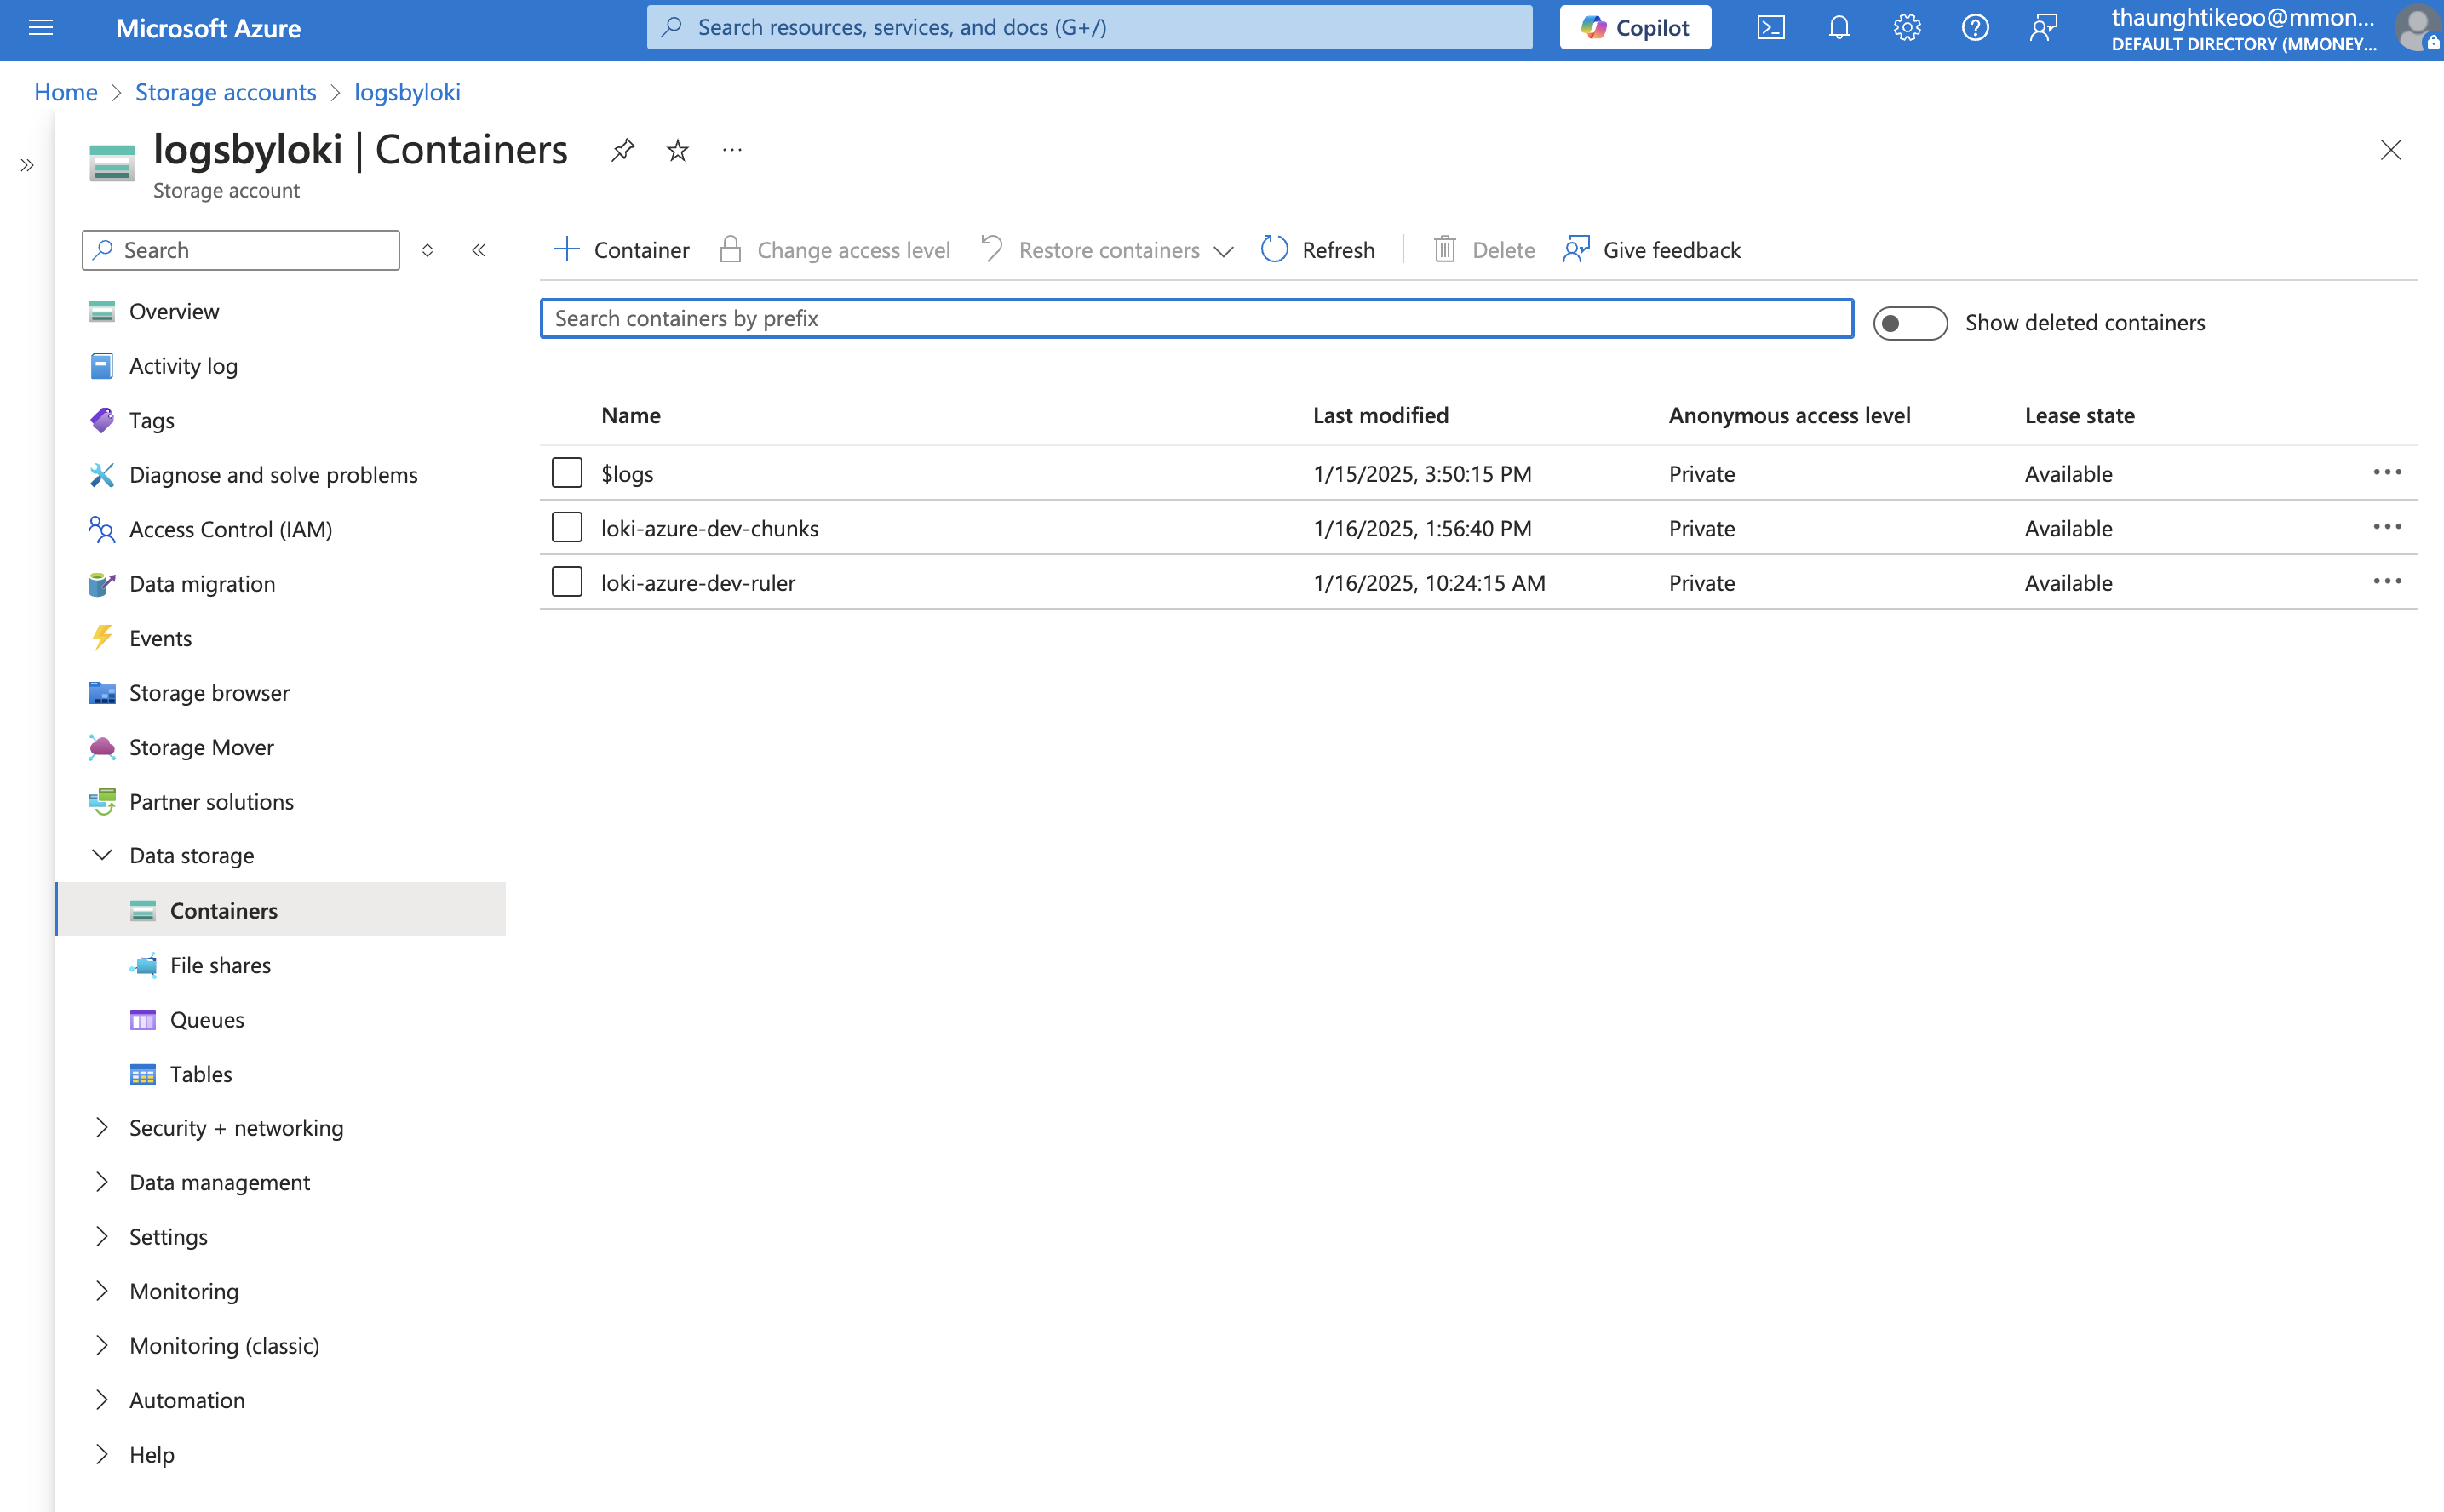
azure portal ထဲသွားပြီး အောက်ပါအတိုင်း containers တွေကိုတွေ့ရမှာဖြစ်ပါတယ်။
Creating the Azure AD role and federated credentials
အရင်ဆုံး ကျွန်တော်တို့ loki ကိုထည့်ချင်တဲ့ aks cluster ရဲ့ OIDC issuer url ကိုသိဖို့လိုပါတယ်။
az aks show \
--resource-group <MY_RESOURCE_GROUP_NAME> \
--name <MY_AKS_CLUSTER_NAME> \
--query "oidcIssuerProfile.issuerUrl" \
-o tsv
နောက်တစ်ဆင့်အနေနဲ့အောက်ပါအတိုင်း credentials.jsonကို create လုပ်ပေးဖို့လိုပါတယ်။ issuer နေရာမှာ အပေါ်ကရလာတဲ့ OIDC issuer url ကိုထည့်ပေးပါ။
{
    "name": "LokiFederatedIdentity",
    "issuer": "<OIDC-ISSUER-URL>",
    "subject": "system:serviceaccount:loki:loki",
    "description": "Federated identity for Loki accessing Azure resources",
    "audiences": [
      "api://AzureADTokenExchange"
    ]
}
နောက်တစ်ဆင့်အနေနဲ့ Storage Blob Contributor Role ပေးဖို့အတွက် azure ad app တစ်ခုကို အောက်ကလို create ပေးလိုက်ပါ။ ပြီးရင် app ကို federated credentials တွေ assign ချပေးရပါမယ်။
 az ad app create \
 --display-name loki \
 --query appId \
 -o tsv

 az ad sp create --id <APP-ID>

 az ad app federated-credential create \
  --id <APP-ID> \
  --parameters credentials.json
နောက်ဆုံးအနေနဲ့ app ကို storage contributor role သတ်မှတ်ပေးရပါမယ်။
az role assignment create \
  --role "Storage Blob Data Contributor" \
  --assignee <APP-ID> \
  --scope /subscriptions/<SUBSCRIPTION-ID>/resourceGroups/<RESOURCE-GROUP>/providers/Microsoft.Storage/storageAccounts/<STORAGE-ACCOUNT-NAME>
ဒါဆိုရင်တော့ ကျွန်တော်တို့တွေ loki helm chart ကို deploy လုပ်ဖို့အဆင်သင့်ဖြစ်ပါပြီ။
Deploying the Helm chart
helm chart ကို deploy မလုပ်ခင်မှာ grafana helm repo ကို addပေးထားရပါမယ်။
helm repo add grafana https://grafana.github.io/helm-charts
helm repo update
Loki basic authentication
Lokiမှာ default အတိုင်းဆို ဘာ authenticationမှ မပါလာပါဘူး။ gateway ကို public access ပေးမှာဖြစ်တာမလို့ authentication တစ်ခုတော့အနည်းဆုံးသုံးပေးသင့်ပါတယ်။ ကျွန်တော်က basic auth ဖြစ်တဲ့ username - password ကိုပဲသုံးပါမယ်။ အရင်ဆုံး username နဲ့ password ပါတဲ့ .htpasswd file တစ်ခုကိုဆောက်ပေးရပါမယ်။ username ကတော့ loki ဖြစ်ပီး password ကိုအဆင်ပြေရာထည့်ပေးလိုက်ပါ။
htpasswd -c .htpasswd <username>
ပြီးရင်တော့ loki gateway မှာ authenticationအတွက်သုံးဖို့ loki-basic-auth ဆိုတဲ့ k8s secret ကို create ပေးလို့ရပါပြီ။
kubectl create secret generic loki-basic-auth --from-file=.htpasswd -n loki

kubectl create secret generic canary-basic-auth \
  --from-literal=username=loki \
  --from-literal=password=lokiadmin \
  -n loki
Loki Helm chart configuration
ဒါကတော့ helm chart valueတွေပါ။ မိမိရဲ့ configuration အရလိုအပ်တာတွေပြောင်းပေးဖို့လိုအပ်ပါတယ်။
loki:
   podLabels:
    "azure.workload.identity/use": "true" # Add this label to the Loki pods to enable workload identity
   schemaConfig:
     configs:
       - from: "2024-04-01"
         store: tsdb
         object_store: azure
         schema: v13
         index:
           prefix: loki_index_
           period: 24h
   storage_config:
     azure:
      account_name: "<INSERT-STORAGE-ACCOUNT-NAME>"
      container_name: "<CHUNK-CONTAINER-NAME>" # Your actual Azure Blob Storage container name (loki-azure-dev-chunks)
      use_federated_token: true # Use federated token for authentication
   ingester:
       chunk_encoding: snappy
   pattern_ingester:
       enabled: true
   limits_config:
     allow_structured_metadata: true
     volume_enabled: true
     retention_period: 672h # 28 days retention
   compactor:
     retention_enabled: true
     delete_request_store: azure
   ruler:
    enable_api: true
    storage:
      type: azure
      azure:
        account_name: <INSERT-STORAGE-ACCOUNT-NAME>
        container_name: <RULER-CONTAINER-NAME> # Your actual Azure Blob Storage container name (loki-azure-dev-ruler)
        use_federated_token: true # Use federated token for authentication
      alertmanager_url: http://prom:9093 # The URL of the Alertmanager to send alerts (Prometheus, Mimir, etc.)

   querier:
      max_concurrent: 4

   storage:
      type: azure
      bucketNames:
        chunks: "<CHUNK-CONTAINER-NAME>" # Your actual Azure Blob Storage container name (loki-azure-dev-chunks)
        ruler: "<RULER-CONTAINER-NAME>" # Your actual Azure Blob Storage container name (loki-azure-dev-ruler)
        # admin: "admin-loki-devrel" # Your actual Azure Blob Storage container name (loki-azure-dev-admin)
      azure:
        accountName: <INSERT-STORAGE-ACCOUNT-NAME>
        useFederatedToken: true # Use federated token for authentication

# Define the Azure workload identity
serviceAccount:
  name: loki
  annotations:
    "azure.workload.identity/client-id": "<APP-ID>" # The app ID of the Azure AD app
  labels:
    "azure.workload.identity/use": "true"

deploymentMode: Distributed

ingester:
 replicas: 3
 zoneAwareReplication:
  enabled: false

querier:
 replicas: 3
 maxUnavailable: 2

queryFrontend:
 replicas: 2
 maxUnavailable: 1

queryScheduler:
 replicas: 2

distributor:
 replicas: 3
 maxUnavailable: 2
compactor:
 replicas: 1

indexGateway:
 replicas: 2
 maxUnavailable: 1

ruler:
 replicas: 1
 maxUnavailable: 1


# This exposes the Loki gateway so it can be written to and queried externaly
gateway:
 service:
   type: LoadBalancer
 basicAuth:
     enabled: true
     existingSecret: loki-basic-auth

# Since we are using basic auth, we need to pass the username and password to the canary
lokiCanary:
  extraArgs:
    - -pass=$(LOKI_PASS)
    - -user=$(LOKI_USER)
  extraEnv:
    - name: LOKI_PASS
      valueFrom:
        secretKeyRef:
          name: canary-basic-auth
          key: password
    - name: LOKI_USER
      valueFrom:
        secretKeyRef:
          name: canary-basic-auth
          key: username

# Enable minio for storage
minio:
 enabled: false

backend:
 replicas: 0
read:
 replicas: 0
write:
 replicas: 0

singleBinary:
 replicas: 0
Deploy Loki
အောက်ပါအတိုင်း loki helm chart ကို deploy လုပ်နိုင်ပါပြီ။
helm install --values values.yaml loki grafana/loki -n loki --create-namespace
loki namespace အောက်က pods တွေကို ‘kubectl get pods -n loki ‘ နဲ့စစ်ကြည့်လို့ရပါပြီ။
NAME                                    READY   STATUS    RESTARTS   AGE
loki-canary-crqpg                       1/1     Running   0          10m
loki-canary-hm26p                       1/1     Running   0          10m
loki-canary-v9wv9                       1/1     Running   0          10m
loki-chunks-cache-0                     2/2     Running   0          10m
loki-compactor-0                        1/1     Running   0          10m
loki-distributor-78ccdcc9b4-9wlhl       1/1     Running   0          10m
loki-distributor-78ccdcc9b4-km6j2       1/1     Running   0          10m
loki-distributor-78ccdcc9b4-ptwrb       1/1     Running   0          10m
loki-gateway-5f97f78755-hm6mx           1/1     Running   0          10m
loki-index-gateway-0                    1/1     Running   0          10m
loki-index-gateway-1                    1/1     Running   0          10m
loki-ingester-zone-a-0                  1/1     Running   0          10m
loki-ingester-zone-b-0                  1/1     Running   0          10m
loki-ingester-zone-c-0                  1/1     Running   0          10m
loki-querier-89d4ff448-4vr9b            1/1     Running   0          10m
loki-querier-89d4ff448-7nvrf            1/1     Running   0          10m
loki-querier-89d4ff448-q89kh            1/1     Running   0          10m
loki-query-frontend-678899db5-n5wc4     1/1     Running   0          10m
loki-query-frontend-678899db5-tf69b     1/1     Running   0          10m
loki-query-scheduler-7d666bf759-9xqb5   1/1     Running   0          10m
loki-query-scheduler-7d666bf759-kpb5q   1/1     Running   0          10m
loki-results-cache-0                    2/2     Running   0          10m
loki-ruler-0                            1/1     Running   0          10m
Add loki data source in the grafana
Loki ရလာပြီဆိုတော့ grafana မှာ loki ကို data source အနေနဲ့ ထည့်ဖို့ အဆင့် အနည်းငယ်ကိုလုပ်ပေးရပါဦးမယ်။
loki gateway ကို loki မှာ port-forward ပေးထားပါ။
kubectl port-forward --namespace loki svc/loki-gateway 3100:80 &
Sample Logs တစ်ခုကို အောက်ကလို post method နဲ့ post လုပ်ပေးလိုက်ပါ။
curl -u loki:lokiadmin \
  -H "Content-Type: application/json" \
  -XPOST -s "http://127.0.0.1:3100/loki/api/v1/push" \
  --data-raw "{\"streams\": [{\"stream\": {\"job\": \"test\"}, \"values\": [[\"$(date +%s)000000000\", \"fizzbuzz\"]]}]}" \
  -H "X-Scope-OrgID: foo"
ပြီးရင်တော့ Loki မှာ data တွေလက်ခံနိုင်ကြောင်းကိုအောက်ပါအတိုင်း ပြန်စစ်လို့ရပါတယ်
curl -u loki:lokiadmin \
  "http://127.0.0.1:3100/loki/api/v1/query_range" \
  --data-urlencode 'query={job="test"}' \
  -H "X-Scope-OrgId: foo"
Add loki data source
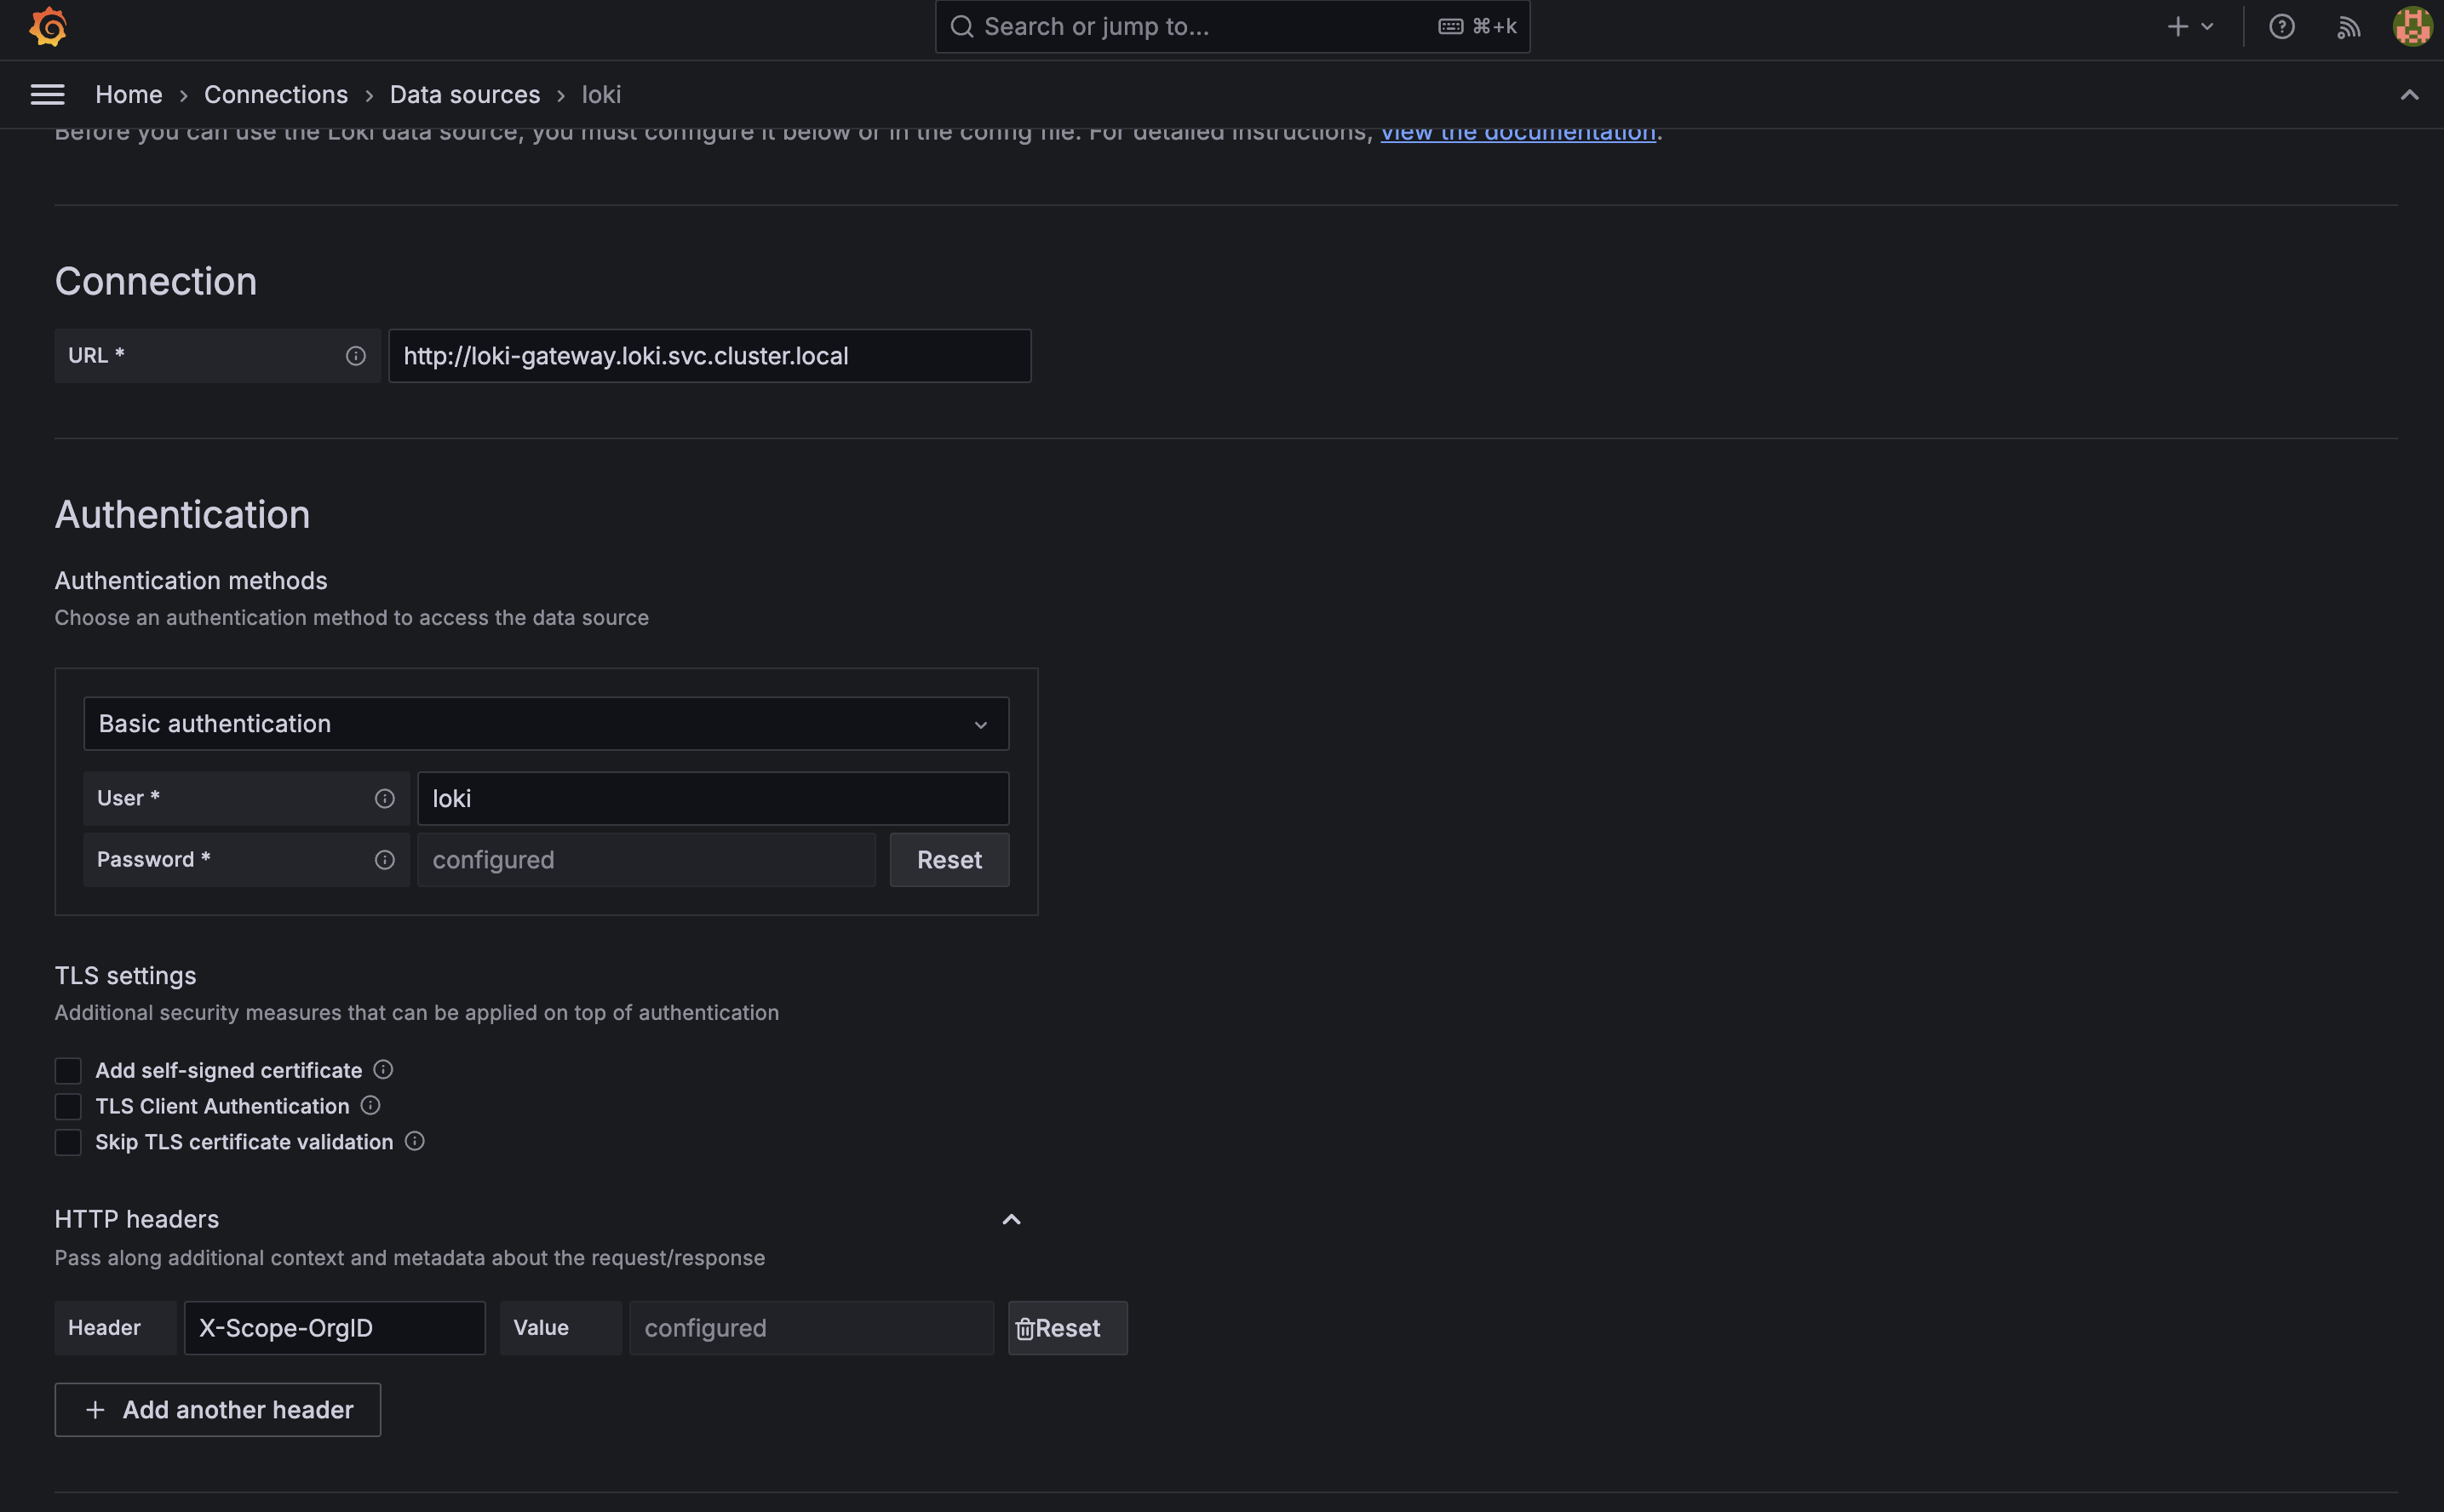
အကုန်ပြီးသွားပြီဆိုရင်တော့ loki data source ကို add ဖို့အတွက် url ထည့်ပေးရပါမယ်။ basic authentication ကိုသုံးထားတာမလို့ .htpasswd ထဲက username နဲ့ password ကိုထည့်ပေးရပါမယ်။
- URL: Use the Loki Gateway URL if Grafana runs in the cluster:
http://loki-gateway.loki.svc.cluster.local - Basic Auth: Enable this and provide the credentials:
- Username: loki
- Password: lokiadmin
- Add HTTP Header:
- Key:
X-Scope-OrgID - Value:
foo
- Key:
View Logs in grafan
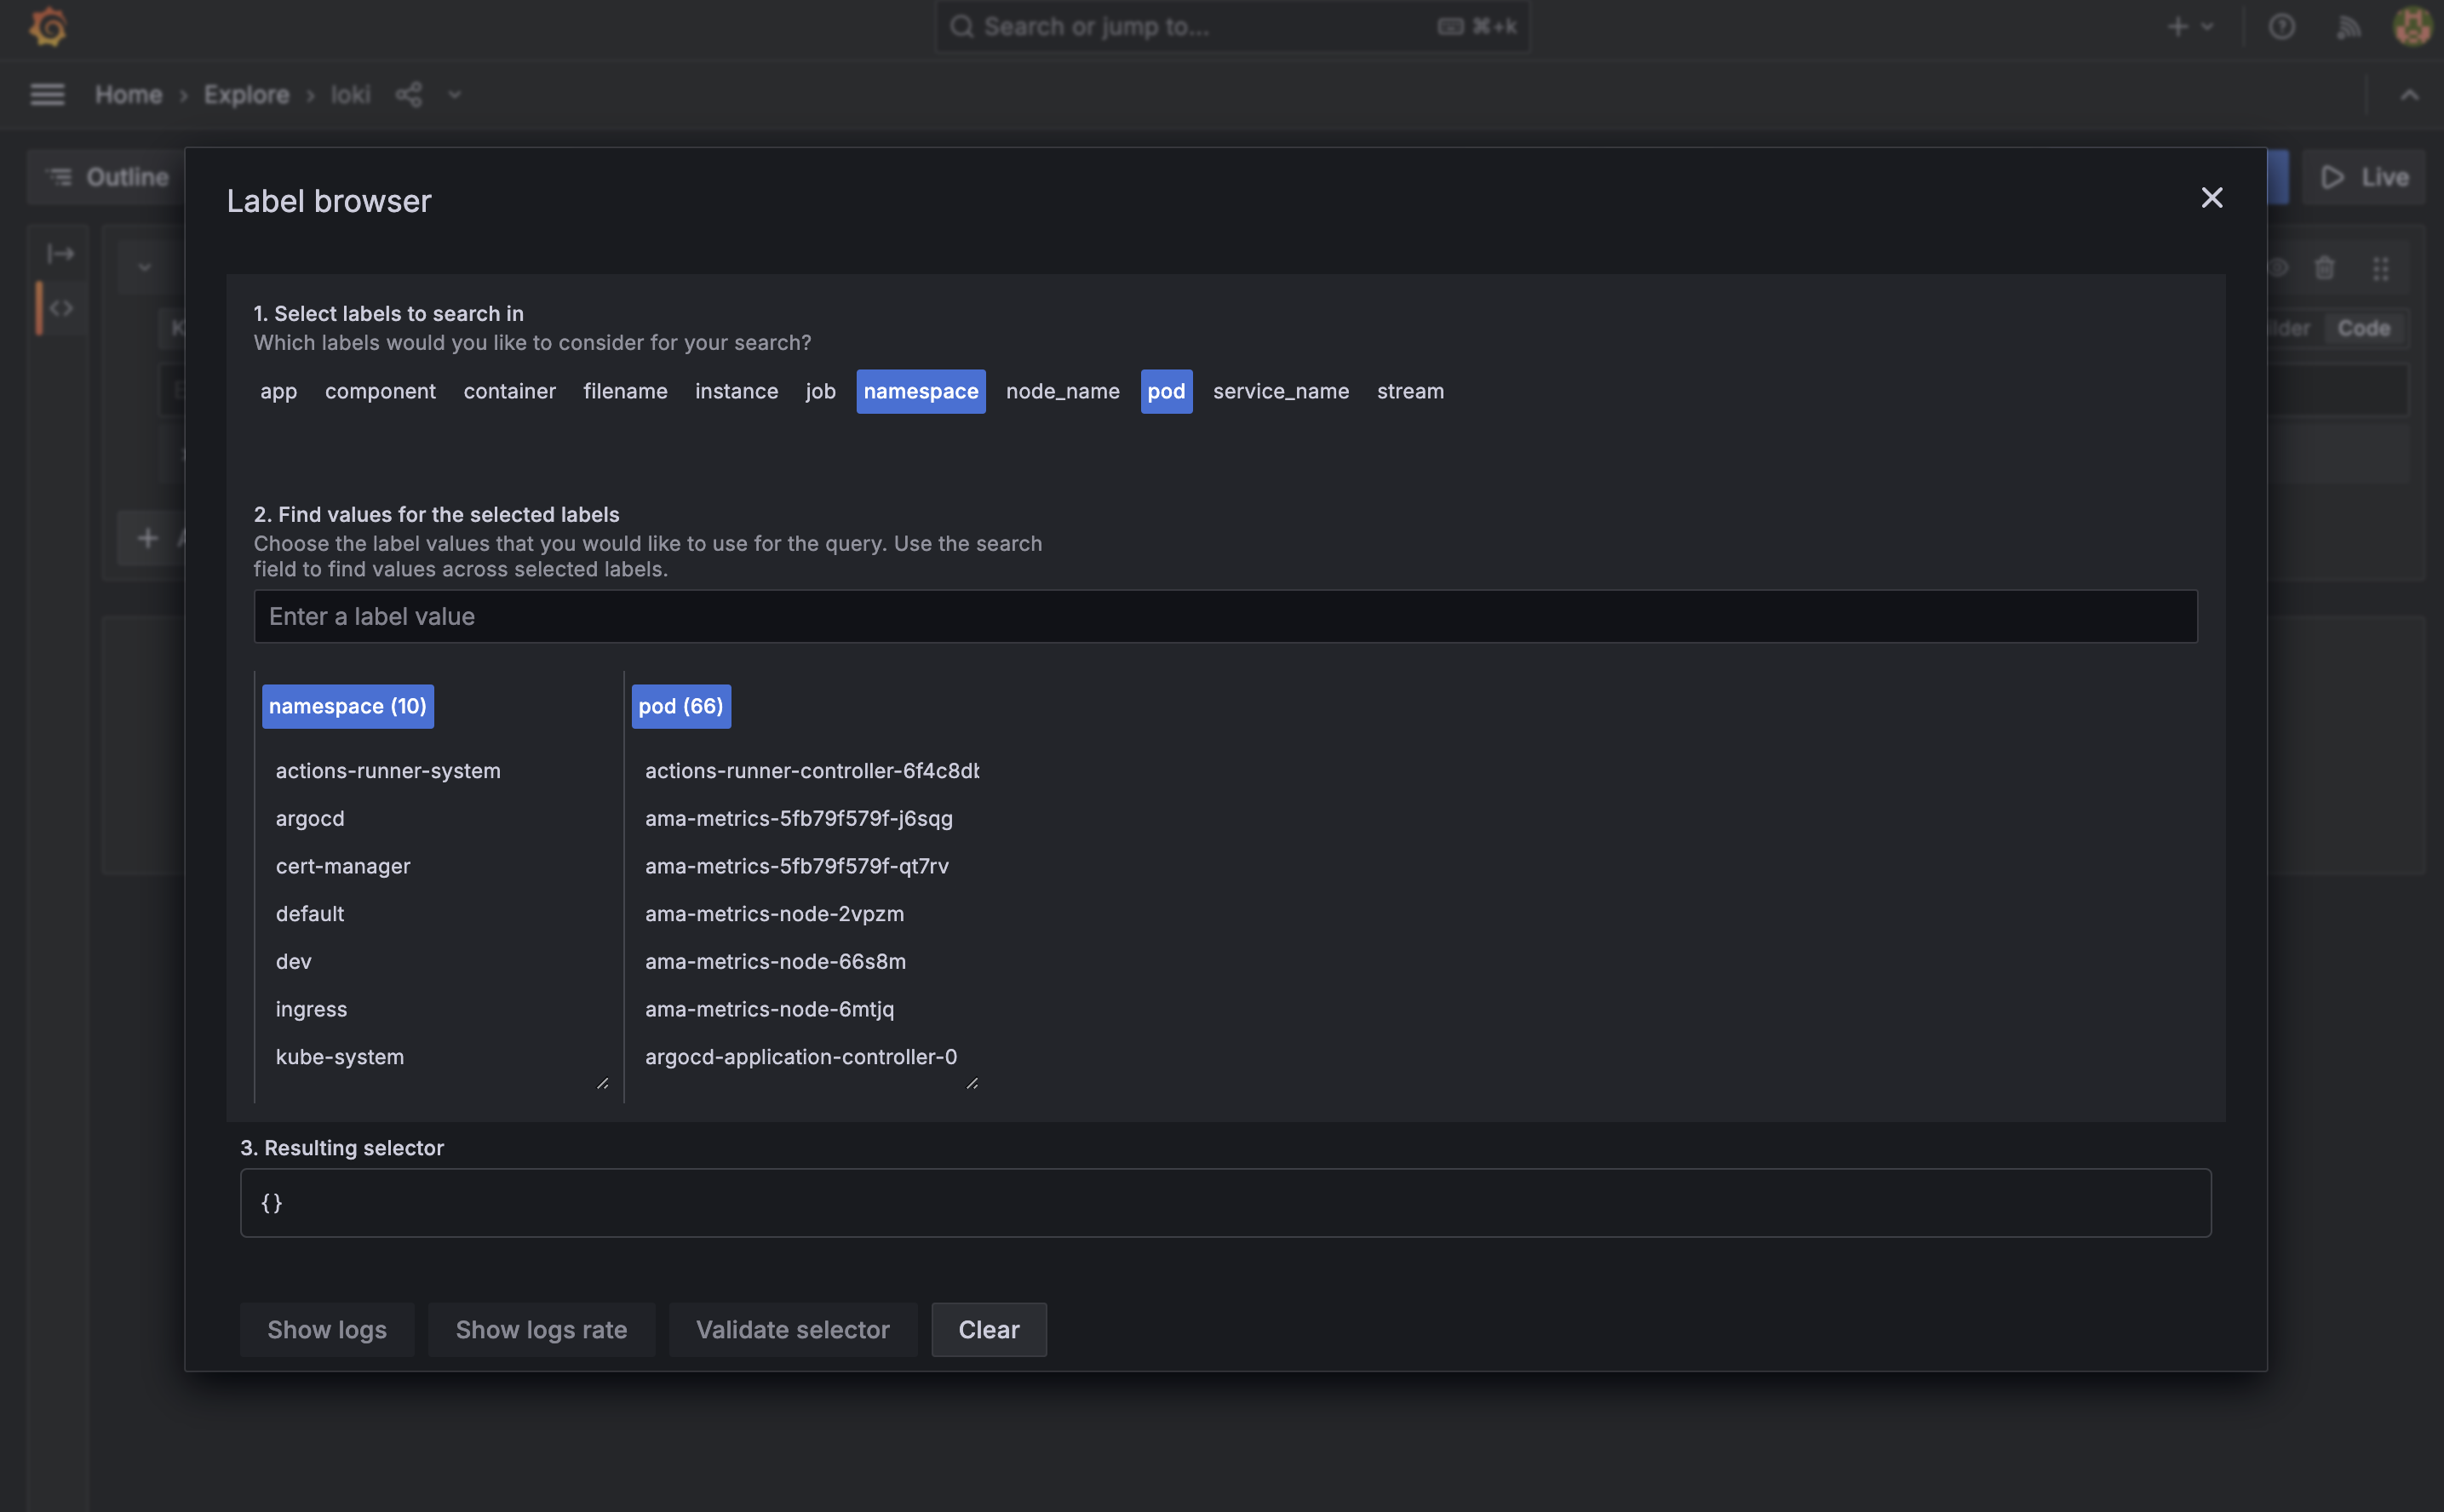
အခုဆိုရင်တော့ Grafana ရဲ့ explore ထဲကနေ Loki ကို source အနေနဲ့ရွေးပြီး logs တွေကိုအောက်ပါအတိုင်းကြည့်နိုင်ပါပြီ။
Kubernetes ရဲ့ pod, container စသည်တို့ကို ကြည့်ဖို့ဆိုရင်တော့ promtail ကို aks ထဲမှာ deploy လုပ်ပေးရပါမယ်။ ကျွန်တော်ကတော့ မရှင်းပြတော့ပါဘူး။ အားလုံးအဆင်ပြေကြမယ်လို့ထင်ပါတယ်။ ကျေးဇူးတင်ပါတယ်။